Lab foundation
Purpose
This lab is designed to show network engineering fundamentals in a practical environment that can grow from OT architecture into automation, security controls, evidence collection, and repeatable learning.
Instead of keeping OT network design as theory only, the lab uses a dedicated Proxmox server as a local platform for building virtual routers, firewalls, workstations, Linux tools, and future monitoring services.
Featured lab article
Installing Proxmox VE on a dedicated lab server
The first step in the OT Network Lab is preparing a standalone machine to run Proxmox VE. This creates an independent server where lab networks and virtual machines can be built safely without depending on a daily-use laptop or desktop operating system.
Proxmox VE is normally installed as a bare-metal virtualization platform. During installation, the selected disk is used for the server and existing data on that disk is removed, so the machine should be prepared as a dedicated lab server with backups completed first.
Why Proxmox belongs in this OT lab
Proxmox provides the base layer for a realistic engineering lab. It allows one physical machine to host several virtual systems, each with its own role in the network design. This supports safe experimentation with segmentation, routing, security zones, and monitoring without needing many separate physical devices.
Independent installation workflow
Choose a dedicated computer or server, check hardware, connect network and keyboard/display access, and back up anything important.
Download the current Proxmox VE ISO installer from the official Proxmox download page.
Write the ISO image to a USB drive using a reliable image-writing tool, then boot the lab machine from that USB device.
Select the installation target disk and filesystem, then continue through the guided installer.
Configure hostname, management IP address, gateway, DNS, admin password, and email address.
After reboot, manage the host from a browser using the Proxmox web interface on port 8006.
First validation after installation
After the first login, the important checks are simple: confirm the management IP is reachable, check that storage is visible, verify the server can update packages, and create a first small test VM before building the full OT lab design.
Useful Proxmox references
These official links support the installation workflow and should be checked before repeating the build on another machine.
Architecture study · September 2026
Comparing two OT segmentation concepts
Before implementing the next stage of the OT lab, two alternative segmentation architectures were modelled and validated in Cisco Packet Tracer.
Concept A uses a Layer 3 core with SVIs and ACL enforcement. Concept B moves the VLAN gateways to tagged Layer 3 firewall subinterfaces, allowing inter-VLAN communication to be controlled through centralised firewall security policy.
OT Segmentation Architecture Study
See the Packet Tracer proof of concept, architecture comparison, scalability plan and the engineering reasoning behind both designs.
Implementation checkpoint · September 2026
OT Layer 3 core and pre-ACL baseline
The selected Layer 3 core concept is now running in PNETLab with five OT VLANs, an 802.1Q access trunk, and a routed transit to the Palo Alto OT boundary.
The implementation article records the VLAN strategy, newest topology, endpoint and firewall reachability, the duplicate-address fault that initially obscured the routed uplink, the exported rollback configuration, and the policy matrix for the first ACL deployment.
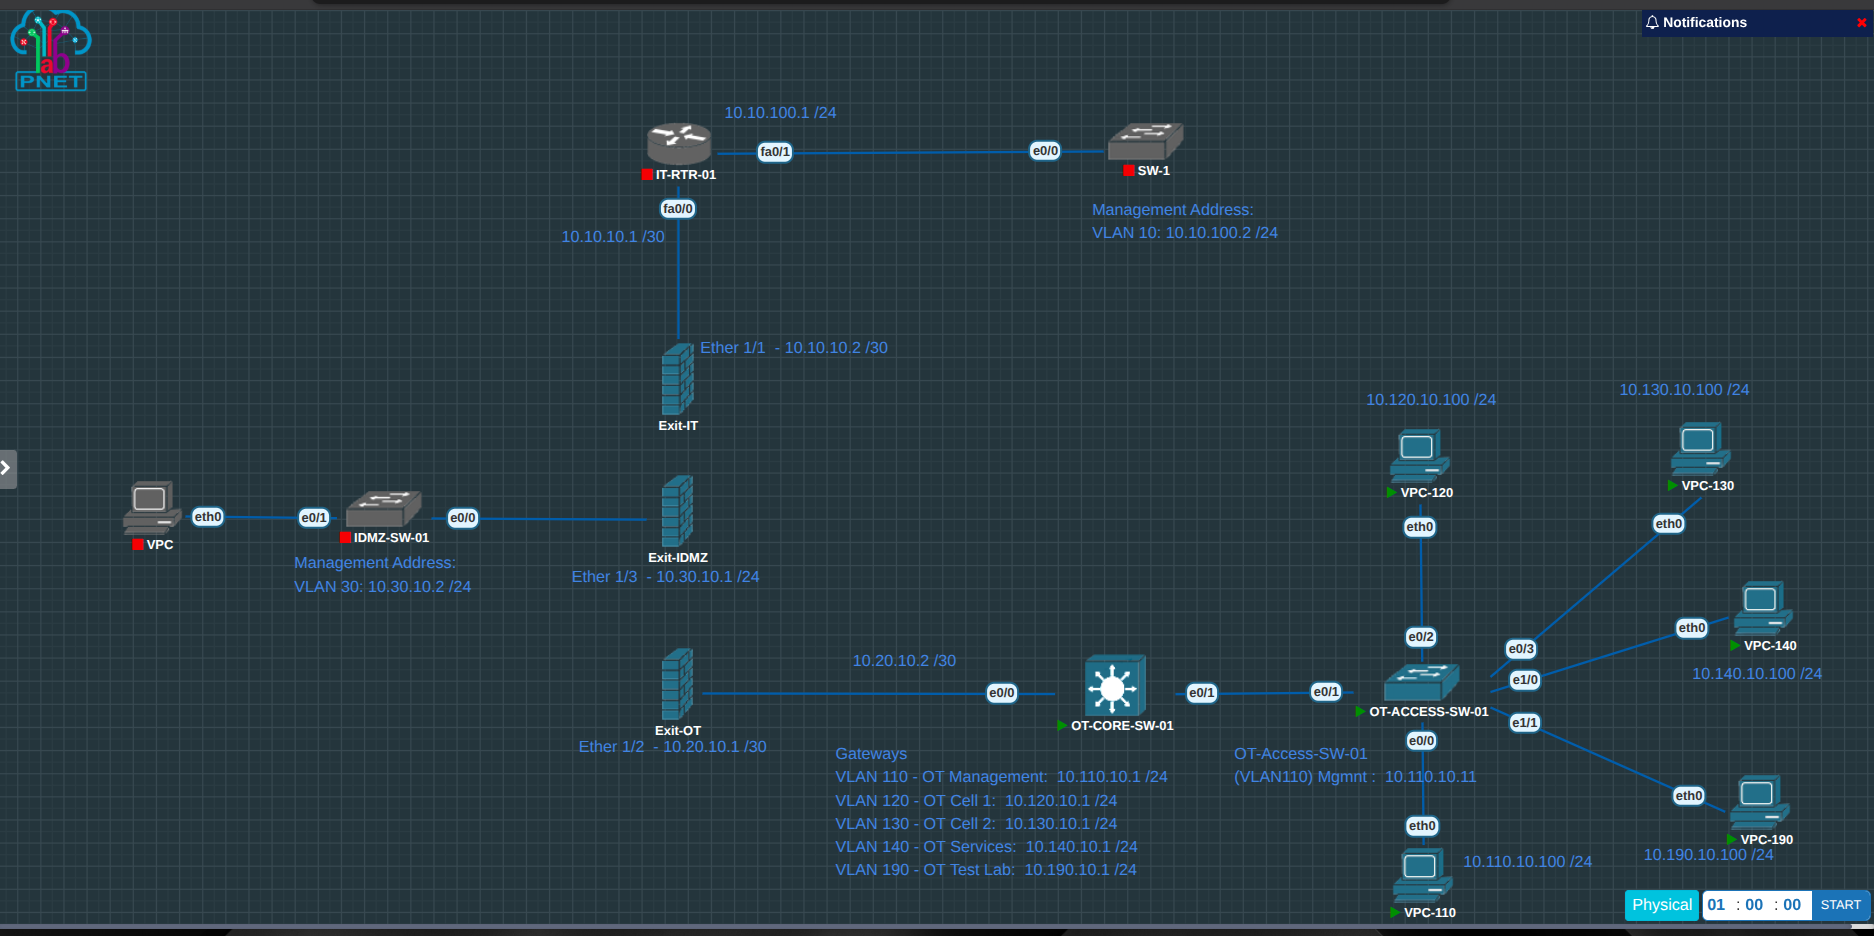
Implementing the OT Layer 3 Core in PNETLab
Follow the transition from conceptual architecture to a recoverable, tested implementation and its planned ACL control model.
Latest lab update · September 2026
Proxmox, PNETLab, and Palo Alto implementation progress
The lab has progressed from installation planning to a working virtual environment with separate IT, industrial DMZ, and OT paths.
The latest article documents the Proxmox host and VM checks, PNETLab resources and topology, Cisco interface validation, Palo Alto Layer 3 interfaces and security zones, and an NTP fault that remains under investigation.
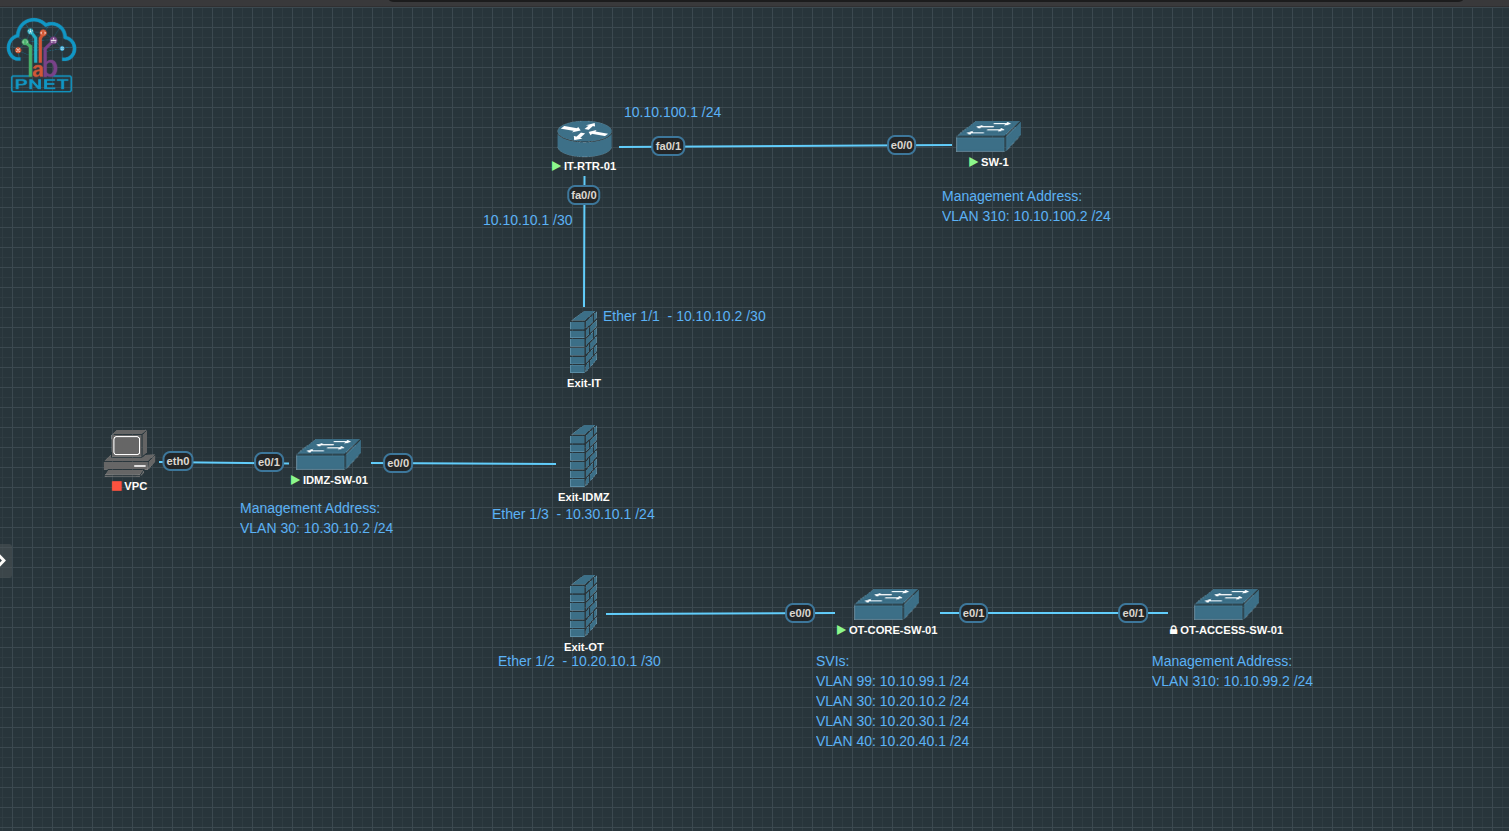
Infrastructure validated
Proxmox host capacity, PNETLab VM resources, firewall VM state, and virtual network connections have been recorded.
Security zones created
Dedicated IT, OT, and IDMZ firewall zones now provide the structure for controlled inter-zone policies and logging.
Building the Proxmox OT Security Lab
Read the full progress article with implementation evidence, validation results, lessons learned, and next steps.
Technology and methods
Automation
Adding Python and Netmiko automation to the OT Network Lab
The lab is not only for architecture diagrams and virtual network design. It is also a place to build small automation scripts that collect evidence, validate network state, and turn manual checks into repeatable workflows.
The first automation article documents a Cisco interface health check script. It connects to a Cisco IOS device with Netmiko, runs interface checks, compares the current state with the previous run, and generates a simple health report.
Interface health check
Use Python and Netmiko to run show ip int brief, identify active and inactive interfaces, and produce a timestamped report.
Baseline and changes
Save the previous interface state and compare it with the current run to detect added, removed, or changed interfaces.
Cisco Interface Health Check Automation
Read the full automation walkthrough with the script, setup notes, report example, and GitHub repository link.
Initial Proxmox OT lab strategy
The lab strategy is to use Proxmox as the stable foundation for a multi-zone OT/IT practice environment. Each virtual system can represent a different part of the architecture, making it easier to test network boundaries, document design decisions, and build security understanding step by step.
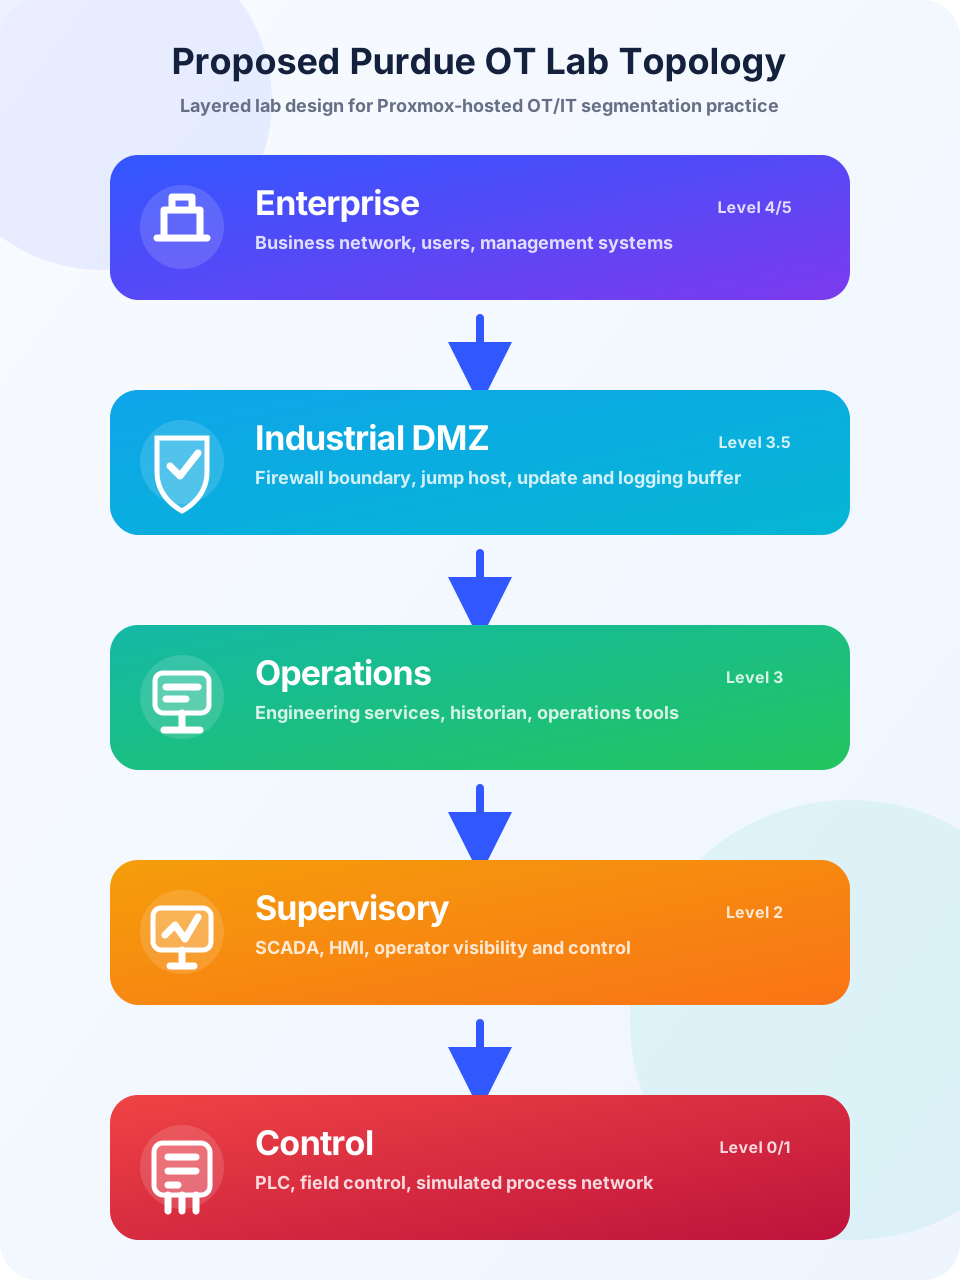
Stage 1 detailed topology
View the first VLAN plan for Enterprise IT, Industrial DMZ, Site Operations, Supervisory, and Control layers.
Firewall and routing zone
Use a firewall or router VM to control traffic between enterprise, DMZ, engineering, and simulated OT segments.
Engineering workstation
Create a controlled workstation VM for administration, network tools, documentation, and testing.
Linux tools server
Prepare a Linux VM for packet analysis, scripting, logging, scanning practice, and future automation tools.
Monitoring and evidence
Add services later for dashboards, logs, packet captures, topology notes, and repeatable portfolio evidence.
What this project demonstrates
- Independent installation of a virtualization server
- Layered network design
- Segmentation planning
- Redundancy concepts
- Secure architecture documentation
- Industrial network context
Network security relevance
Segmentation, resilience, and controlled communication paths are core ideas in OT security and Network Security Engineering. A Proxmox-based lab gives these ideas a practical place to be designed, tested, documented, and improved.
Next improvements
The next stage is to resolve NTP reachability, add least-privilege firewall policies with logging, activate the planned OT VLANs, introduce representative engineering and control assets, and collect repeatable packet and log evidence.
Project on GitHub
Explore the OT Network Lab repository.
Open the repository to follow the architecture, Proxmox and PNETLab implementation, zone design, validation evidence, automation, and future OT security exercises.
View on GitHubImplementation
Proxmox, PNETLab, firewall, routing, switching, and segmented-zone build evidence.
Documentation
Topology diagrams, address plans, validation results, security boundaries, and engineering decisions.
Next milestones
NTP remediation, least-privilege policies, OT services, monitoring, packet captures, and lessons learned.